For many of us, data connection is the first thing we think of when touching down in a different country. Besides helping travellers navigate their way through unfamiliar streets and communicating with locals in a foreign language, a data connection is essential for updating others on our adventure overseas. After all, if you don’t post a photo on social media, did it even happen?
I’m sure you’re familiar with the usual means of getting data connection overseas; subscribing to your local telco’s data roaming services, renting a WiFi router from the airport or getting a prepaid SIM card at your destination. These methods can be expensive, troublesome and/or inconvenient.
On my search for an alternative to solve these woes, I came across AIRSIM. Intrigued by its unique features, I ordered one to try for myself. Scroll on to read my review about it!
About AIRSIM
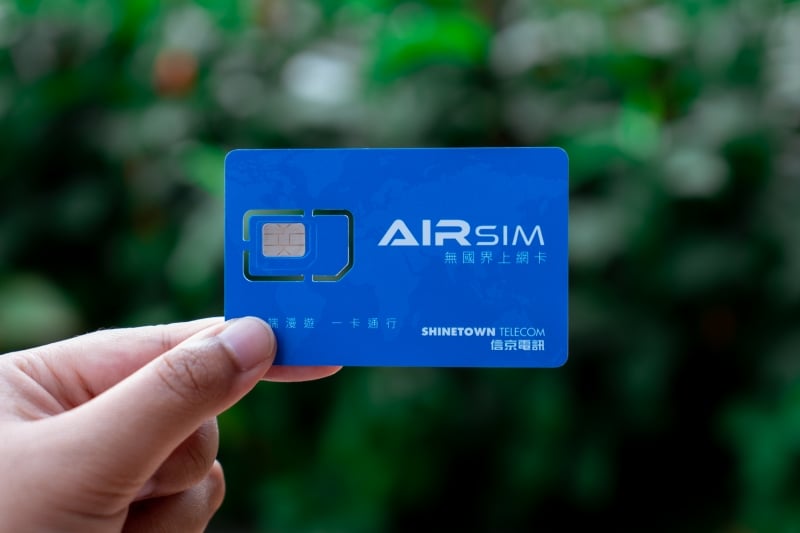
AIRSIM may look like the usual travel data SIM card, but this mighty SIM card can be used in multiple destinations — more than 100 countries in fact! Whether you’re going to popular destinations (such as Japan and the USA) or exploring exotic destinations (such as Kyrgyzstan and Montenegro), AIRSIM has you covered. What’s more, AIRSIM provides unblocked access in China, allowing users to conveniently access WhatsApp, Google, Facebook, Instagram and more without the need for a third-party VPN.
The technologies that help AIRSIM achieve this are Over-the-AIR (OTA) and Soft SIM. In layman terms, what this system does is transform your AIRSIM into a local SIM according to your location. Now you can use just one SIM card for multiple destinations by purchasing data packages according to your needs (read: continuous data connection while travelling across continents)!
Ordering AIRSIM
I ordered my AIRSIM on their website and made the payment with PayPal. You’ll be happy to know that free delivery via normal mail is provided. I got mine in three days! The whole ordering process was super convenient and fast.
Alternatively, for those last-minute travellers who don’t have the luxury of waiting 3 to 5 working days, you may opt for self-collection from their office or SingPost A.M. Mail (delivery within 1–2 working days, at an additional charge). AIRSIM is also available at all Cheers and SingPost outlets.
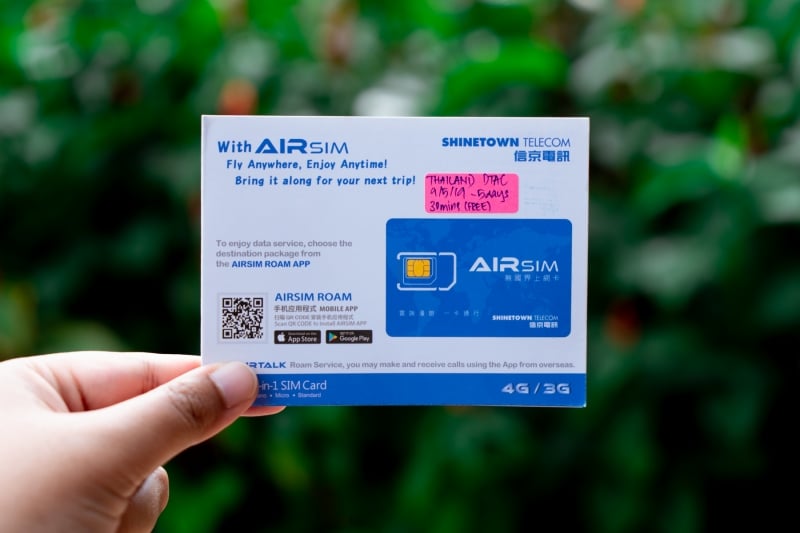
The SIM card came to my mailbox in an envelope, which contains the AIRSIM card (with cut-outs of all SIM card sizes; nano, micro and normal) and a detailed document with instructions on how to use your AIRSIM.
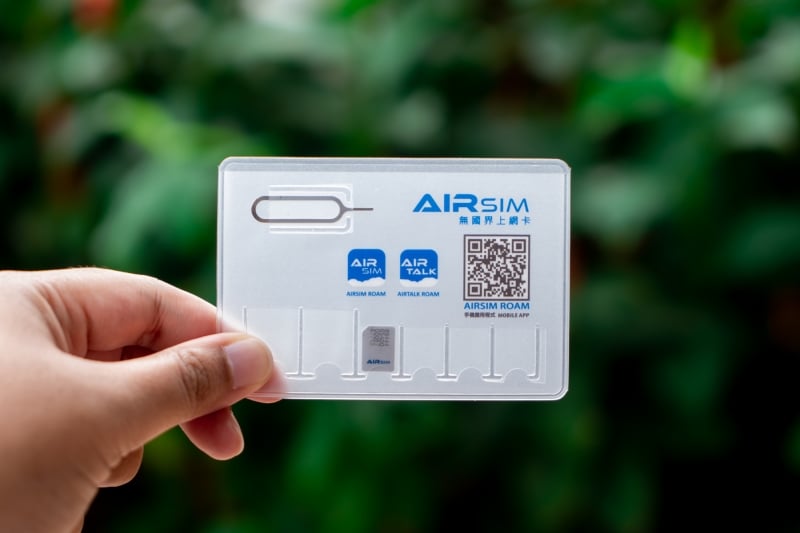
The item I was most excited about is the cardholder complete with multiple SIM card slots and a SIM ejector! I don’t know about you, but I always have a hard time finding my local SIM card and SIM ejector when I’m back in Singapore. Having it all in one place definitely helps me be more organised.
Using AIRSIM
Setting up and using AIRSIM is as easy as 1, 2, 3!
1. Download the AIRSIM ROAM app
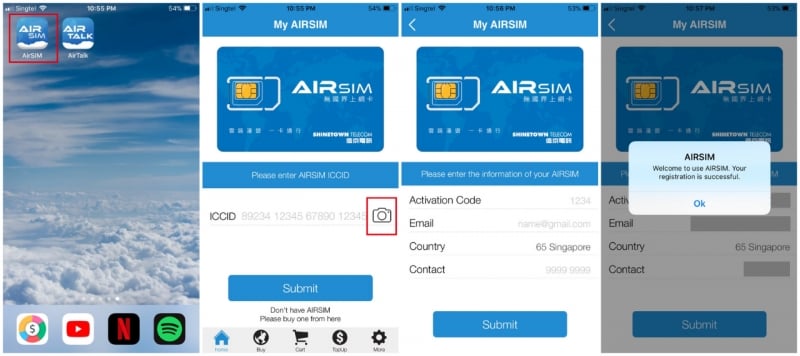
Before departure, I downloaded the AIRSIM ROAM app to register for an AIRSIM account. I simply scanned my ICCID (as I was too lazy to enter the long string of numbers) and entered my activation code and personal particulars. That’s it!
2. Purchase your preferred data package
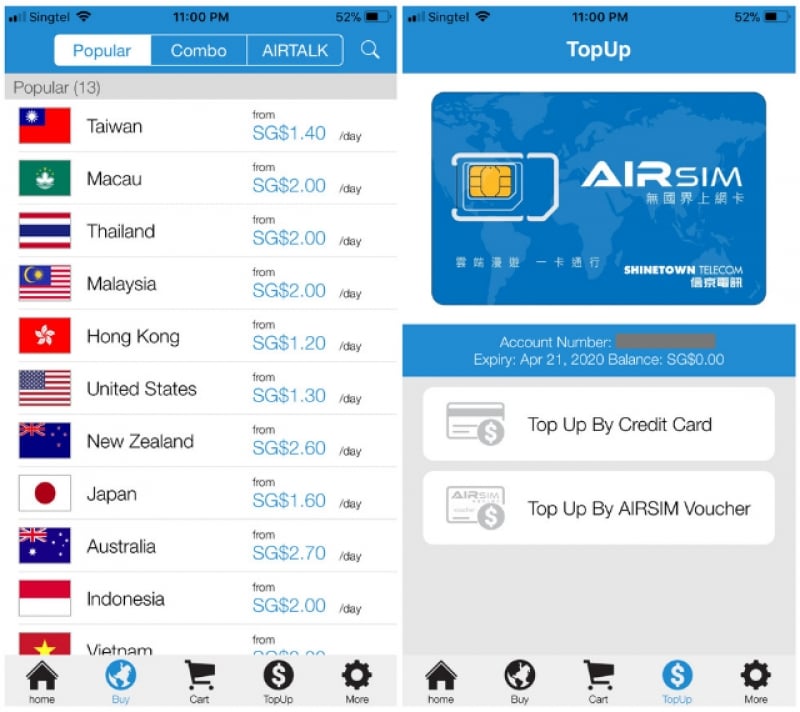
During the setup process prior to my trip, I was impressed with how simple it was. I was able to complete registration within 2 minutes!
I purchased my data plan on the app directly via PayPal, which would’ve allowed me to start using data immediately if my plan started on the same day. However, if you’re a spontaneous traveller and haven’t decided where you’re going yet, you can first top up using your credit card. Then select your preferred data plan via the AIRSIM ROAM app when you’ve made up your mind!
Note: Make sure that you purchase the data plan before you leave for your destination, as you’ll need an Internet connection to make your purchase.
3. Pop in AIRSIM and await data connection
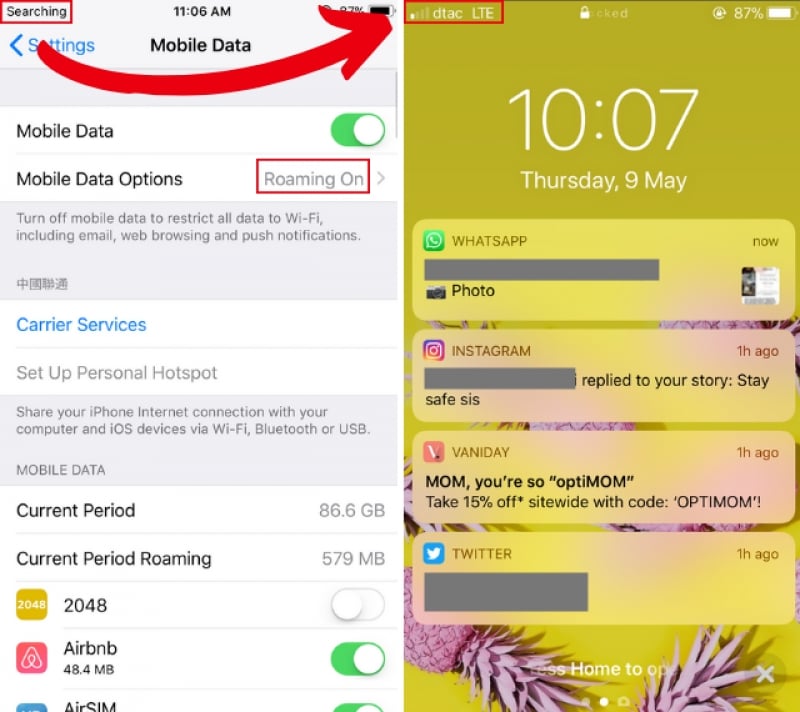
Upon arrival, I popped my AIRSIM into my mobile phone and switched Mobile Data and Data Roaming on. Although the website stated to wait for about 3 minutes for the AIRSIM to locate and connect to a local network operator, my mobile signal changed from having no network to having a mobile operator’s name with an LTE signal within a minute! Notifications started rolling in instantly.
My AIRSIM experience

Equipped with an AIRSIM in my phone, I went on a work trip to Thailand recently to uncover hidden gems in Thailand. This brought me to less “touristy” and even secluded areas of the country. In fact, my group and I were the only tourists in most attractions! I was honestly worried about how AIRSIM will perform in the corners of Thailand.
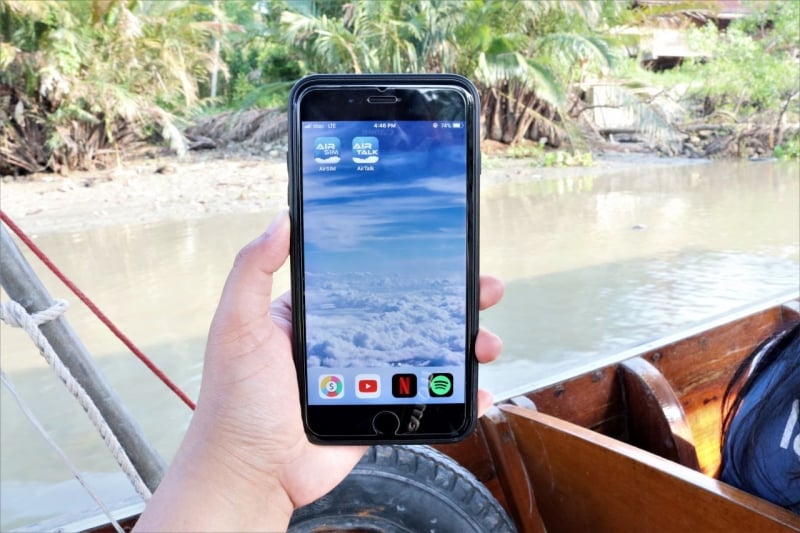
I even had LTE data connection on a boat in the middle of a river in Thailand!
I had to post up Instagram stories on our @tripzillamag account at the end of each day. Exhausted after a full day of activities, I was so close to ripping my hair out when the hotel’s WiFi was painfully slow. Thankfully, I had the option of switching to mobile data, and the stories went up significantly faster. Phew!
While there was no need to, I was also heartened to know that I could make a call to AIRSIM’s 24/7 customer service support via WhatsApp, Facebook Messenger and WeChat should there be any issues requiring assistance.

I also did a “Halalzilla Ramadan Takeover” where I had to post up vlog-styled Instagram stories of my experience of fasting while travelling in real time. With a stable and fast data connection, the takeover went on without a hitch.
At the end of my trip, I have to say that AIRSIM has worked wonders for me as a traveller. I’ll definitely use it again for my future trips since it’s reusable and provides connections to 100+ countries in the world!
Make calls with AIRTALK
With AIRTALK, you can make local and international calls with a WiFi or data connection, and even divert your mobile number. This allows you to connect with your loved ones without hassle or expensive charges.
Using AIRTALK
To use AIRTALK, you’ll need to have an AIRSIM account first. You can purchase your preferred AIRTALK package in the AIRSIM ROAM app. Note that every data package has an optional 30-minute free talktime that can be selected during purchase.
1. Download the AIRTALK ROAM app
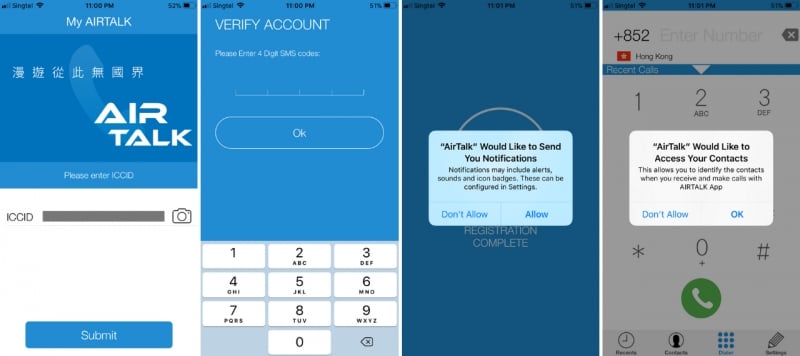
Before departure, I downloaded the AIRTALK ROAM app. To verify my account, I simply had to enter the one-time password, sent via SMS to my mobile number that is registered to the app, and accept all the app permissions.
2. Make calls on the dialer page
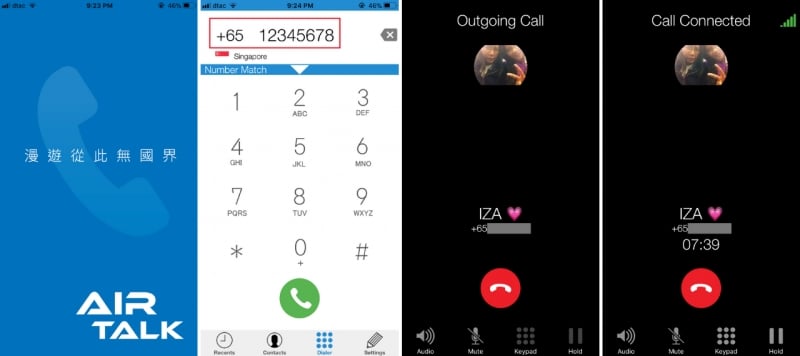
Since I share everything with my sister, I called her almost every night. Making a call on AIRTALK is basically the same process as making normal calls! I just had to key in the country code and mobile number on the dialer page in the AIRTALK ROAM app.
3. (Optional) Just divert your mobile number to AIRTALK’s system
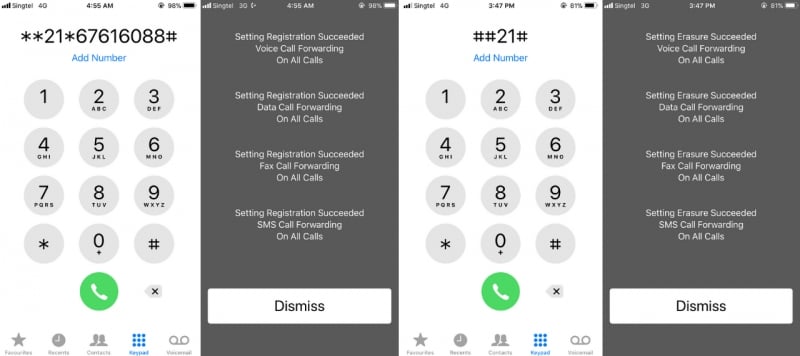
Since I would like to receive calls to my mobile number directly and see the caller ID of any incoming calls, I diverted my mobile number to AIRTALK’s system. Prior to departure, I dialled **21*67616088# and received the notification as seen on the second screen.
Note: When callers make calls to your diverted mobile number, they will be prompted to re-enter your phone number in order to connect the call through the AIRTALK ROAM app.
Back in Singapore, I cancelled the call divert by simply dialling ##21#.
My AIRTALK experience
I used AIRTALK to update my family on my day-to-day activities at the end of each day. It seems that the connection might take a while to stabilise, as during my first call, the call got disconnected twice. However, subsequent calls on other days at the same location were fine without interruptions. The calling process was straightforward and calls were connected quickly. The call quality was also pretty good as both parties could hear each other clearly.
I personally prefer AIRTALK to other calling services as my loved ones were able to see that I was the one calling instead of an unknown foreign number. I also made a few calls at the airport before departure to ask them if they wanted any last-minute souvenirs since I had some leftover Thai Baht. I didn’t have to by-pass any pesky airport WiFi login pages to make calls!
Final verdict
Summary:
- Easy to set up
- Fast and stable data connection
- Easy-to-use app interface
- Affordably priced data plans
- Useful cardholder with multiple SIM card slots and a sharp pin
- APN set automatically in most countries
- Highly convenient and eco-friendly reusability
- Can serve as backup in times of need, even with an existing data option
- 24/7 customer service support
Rating: 4.5/5
The one-stop app is a breeze to use and the SIM card provides a reliable data connection, which if disrupted can easily be fixed within minutes. Its reusability also means that it can be your single, go-to SIM card for travelling, without needing to make additional purchases at the airport.
Bid farewell to expensive data roaming services, troublesome WiFi router rentals and long queues to get a prepaid SIM card at your destination. Travel hassle-free from the moment you land with AIRSIM!


